Showing posts with label Birthday Cards. Show all posts

Monday, November 19, 2012

Another Chinese Auction basket of cards

I promised it wouldn't be three weeks before the next post! I wouldn't want anyone to contemplate another search party! I am most thankful for awesome blog friends like you!

During my blog absence, I put together another "basket" of cards for a Chinese Auction that was taking place at a benefit dinner. The dinner took place the same weekend my Aunt and Uncle were here. I felt making a basket was the least I could do since we wouldn't be attending.


This basket had a variety of cards much like the last basket. Since the benefit was close to the upcoming holidays, I included some holiday cards in this basket. Ready to take a look?


A wedding card!


Two birthday cards.
The owl and the frog were cut from the Create A Critter cartridge.
The cards measure 4x5 and 4x6...if that helps you picture the size of the cuts.


A get well card. Isn't he cute? Feeling ruff?  he he he
This card is a 4x5 card and the dog was cut using the Create A Critter cartridge.
I don't remember the size of the cuts on these cards. There was one day where I cut a bunch of things out so I would have some ready when it was time to make cards. It works great for making cards, but not so much when it comes to having information for a blog post. 


These two cards are blank on the inside. These two and the wedding card were made using die cuts made by K & Company. Those packages of die cuts are a great way to make cards! I have been waiting for them to go on sale at JoAnn's and then walk in armed with a coupon for an extra discount. YEP! I'm that girl!
The mouse in the tea cup stamp is from Stampin' Up.


Two winter/Christmas cards.
The snowman and cardinal are made by K & Company.
The paper is from a stack I picked up at Hobby Lobby.


A look at the inside of the winter/Christmas cards.


The Thanksgiving cards.
The turkey stamp is by Stampabilities.
The paper is from the stash (Do you believe me that I have a paper problem??)


The inside of the turkey cards.


All the cards were put in this bowl, along with some stuffer and then wrapped in plastic!
I hope the cards help make someone's day!
I also send well wishes to the person (and her family) the benefit was for.

One more look at the whole thing:


For those of you that read about the first basket...
Our friend has finished her treatments and has received good news from the doctor.
Thanks for the prayers and kind words!

Thanks for stopping by!
What kinds of things do you hope to see when you buy tickets for a Chinese Auction??
(we recently won a prize at one, that post is coming soon)
Hugs!
~Jen

Partying here:


Pink Hippo Party

Saturday, September 15, 2012

A Peace Sign Birthday Card

Happy Weekend Everyone!!! Earlier in the week was Jim's Mom's birthday. We had a weenie roast out back. Jim's Mom and Step-Dad, and Jim's Grandparents joined us out back. We, of course, had too much food. Jim's Mom LOVES the peace sign!!!


A little sidewalk chalk birthday sign.
She loved it!!

Jim's Mom is one of the easiest people for me to make cards for.
She appreciates them on so many levels.
When she has some to send, she puts some thought in to who she sends them to.
She wants to send them to people that will appreciate them as well.
Her birthday was no different. Jim and I talked about what to make and it came together like a charm!


Ready to take a look at how it came together???


This ribbon came home after a trip to Hobby Lobby.
I had Jim's Mom in mind when I bought it, but figured I could also use it for a number of things.
I hadn't used it yet.
I pulled the ribbon out and the ribbon determined the colors for the card!


I used the Disney/Pixar Cars cartridge to cut the peace sign and the circle for behind it.
I cut everything at 4.5 inches.
I did cut the peace sign twice. I want to add some dimension.
You can see in the photo above that I used foam dots (or squares actually) to give the dimension.
I used the squares between the yellow and the first peace sign and then between the two peace signs.


I added some ribbon across the top.


and a sentiment across the bottom.
The sentiment is from a set of Christmas stamps I have that is made by Fiskars.


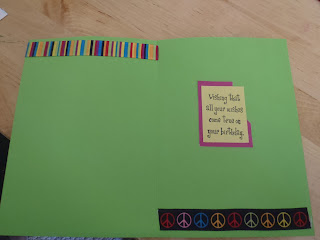
Added some more ribbon to the inside, as well as a sentiment.


She also received A LOT of stamps on the back!!
I don't normally put that many on the back, but this was fun!!


The  front of the card and the front of the envelope.
Yep, added more ribbon there.
Apparently I was ribbon happy the other day!


Ah yes! My favorite part. If you have been here to see other cards, you know I like to add a little something to the back of my envelopes. This one was no exception.
I added a peace sign stamp (not sure who it is made by)
I also added a little quote sticker.

I think it turned out pretty cool and she LOVED it!!!!!


Yep! We sang happy birthday to her!
How fun! After cake, we sat around the fire for awhile.
It was too bad we did this on a week night. We could have sat around the fire for quite some time!!

What do you think of the card??
It was pretty simple.
If you make one, I'd love to see you share it on the Facebook page!!!!

Peace!

Friday, August 17, 2012

A 13th Birthday Card

Changing things up a little bit. Today I am sharing a card I made. A friend's daughter turned 13. She asked if I could make her a card with zebra stripes and pink. Let's take a look.


My local scrapbook/craft store didn't have any regular zebra stripe paper.
WHAT IS UP WITH THAT???
I wasn't driving the 15 miles to Hobby Lobby. We all know I would have walked out of there
with more than one sheet of zebra stripe paper.
I kept up the search and found this fabric paper sort of stuff. It would get the job done.

The 1 and the 3 are chipboard (from the stash)
I covered them with pink Stickles (glitter glue) I don't remember the exact color and 
the craft space just had some changes done to it so I am not sure where everything is to 
double check for you. So sorry. :(

The crown is a cut off the Create A Critter cartridge. It is the crown generally given to the frog.

The pink glittery ribbon was also in the stash.

 The inside sentiment was computer generated.
The picture turned out a little blurry, but it is the only I have.
I take two and three of everything, but not this one. Hmm...must have been looking forward to getting to work to get the day over so I could get vacation started!!!


If you have been here for my other cards, you know I like to decorate the envelope in some way.
I used my favorite little Monkey, Changito!

I've been told Haley loved her card.
I hope it is true. I had fun making it.
Happy Belated 13th Birthday Haley!!!

Do you have lots of stuff in your "stash?"

Partying here:


The Taylor House


Wednesday, May 16, 2012

Freshly Picked - Flower3

Hey! Are you surprised to see me? Something had to give, and unfortunately it was the blog. Between working, making/selling Mother's Day Cards, bridal shower gifts, starting graduation stuff and cleaning up and working on the backyard/garden...life has been CRAZY!!!! Crazy good, but crazy!

Here is another cut from the Freshly Picked cartridge. I used it to make Mother's Day cards. I think it would also make cute birthday cards or any sort I'm thinking of you card. Here is the rough draft.


After I decided I liked how it went together, I cut out a bunch!!


I used my Gypsy to weld two shadow pieces together for the card base.
All other layers that I cut are shown above.


The inside of the rough draft.


The first two pieces I adhered together were these two.


I cut this layer out of different patterned papers. I wanted to see how both would look!
I like them both. I do think I like one more than the other. How about you?


I inked around the edges of most layers to add some dimension/depth.


Added the flowers.
I did use foam dots between layers to give it even more depth/dimension.


These ones are waiting to be attached to the card base.


Attached to the card base and with sentiment.


Waiting for outside sentiment.


A different outside sentiment.


Here's a peek at all 4 done with their envelopes.
I ended up having to make envelopes for these cards because the envelopes I had on hand
were 1/4 inch too small. I will do an envelope post all by itself.
I do love the effect of the coordinating envelopes though.


Most of the cards had the sentiment seen above.
I inked around the edges of this layer with ink that matched the flowers on the front of the card.
As always, I added a little stamp to the back of my envelope.


I always sign my cards and add some sort of fun stamp to the back of them too.

I think these cards turned out fantastic. The pictures truly don't do them justice.
I have lots I want to share so lets hope things are settling down a little bit and I can share and catch up with all of you. Not only have I neglected my blog, I've neglected all yours too. I'm very sorry.

I hope all your projects are going well!
Thanks for stopping by!
hugs!!!! ~jen

Monday, April 2, 2012

One stamp, some scraps, three cards

It is a beautiful day here in Western PA. I admit it, I sat on the back deck in my shorts, tank top, and sunglasses and closed my eyes for a few earlier. I'm pretty sure I could have taken a nap like that. Our backyard is west facing, that means there isn't a shortage of rays (as long as that nice warm ball of fire comes out for the day)

The peas are growing, as are the beets. I'm a little worried about the spinach seeds. I am wondering if perhaps they didn't receive enough water. I didn't plant the whole packet so we have a second chance if needed. The carrots and onions were planted over the weekend. I planted the chard today. I planted some flower seeds over the weekend too.  Everything will need covered tonight, we are expecting a frost after 2 am.

Enough about the garden. Let's get crafting shall we?

I used a stamp from Inkadinkado to make the following cards. The card bases were premade. Any other paper on the cards came out of the scrap drawers. I have recently cleaned out those drawers and given paper away, but they are still overflowing...ah I love paper!


I did use embossing powder and a heat gun on the stamped image. You can't necessarily tell that from looking at the pictures, but I promise I did.

I hope everyone made it through Monday! If the sun is out where you are, I hope you took a couple minutes and got a couple minutes of peace and vitamin D!

linking up here:

Hugs ~ Jen

LinkWithin

Related Posts Plugin for WordPress, Blogger...