Wednesday, August 22, 2012

A rolling pin towel holder

Fall is in the air. Yesterday, I saw my first tree with its leaves changing. /sigh...so soon? already?
I am enjoying the cooler weather though. We started ripping tomato plants out of the ground. We really wanted to plant some fall crops last week, but now we are shooting for this week. Keep your fingers crossed. We have been getting lots of canning done and there will be pictures of that in the future. PROMISE!

I wanted to give you a closer look at the rolling pin towel bar that you had a glimpse of  when I posted about the countertop.   


Above is a look at the end result. The link back to that post can be found above the picture as well.
:)


The rolling pin used as the towel bar is the same rolling pin as in this picture.
These two pieces were given to me by a friend who was cleaning out her basement.
I love it when my friends bring me their "junk!!"
When she brought them to me she said "I knew if there was anyone that could give these things another life, it would be you!" {giggle}
These pieces sat on the dining room table for a couple days and "their new life" hadn't come to me yet.
When we started making room for Grandma's china cabinet (post coming soon, I PROMISE) these pieces were placed in a basket to go upstairs.

When we redid part of the kitchen there was a bare spot on the side of the 'bottom cupboards.' That is when the light came on. I went and got the rolling pin (and Jim) and I went over to where I wanted it and said "Is there any way you can make this hang here?" He said "Of course!", took the rolling pin and disappeared downstairs. He would come back up now and then but there wasn't any sign of what was taking place. Several hours later he comes upstairs with a container that had parts, pieces and tools and that is how we get to this picture:


Well now!! Isn't that nifty!!! He even stained them!!


Speaking of stain, we have decided we are going to stain this end of the door.
We made a cut here for it to fit and the cut is a little tooooo bright!

Back on track, the rolling pin rests in the little notches. I call them J hooks.
They looked like J's before he attached them to the cupboard.


A closer look at the notches and the lovely green handles!!!
I think the green handles are my favorite thing about the rolling pin...
ok, a close second behind being the first person my friend thought of!!!!!


I had been sorting linens for a different project (the answer to the question you just asked yourself in your head is TOOOOO MANY!!) I went and got this towel from one of the piles.

and....


There you have it! 
I think it works nicely on this space!
We already had all the pieces, parts, etc for this project!!!

Clever huh???

What would you have done with the rolling pin????


Partying here:


Friday, August 17, 2012

Growing blackberries on a telegraph pole

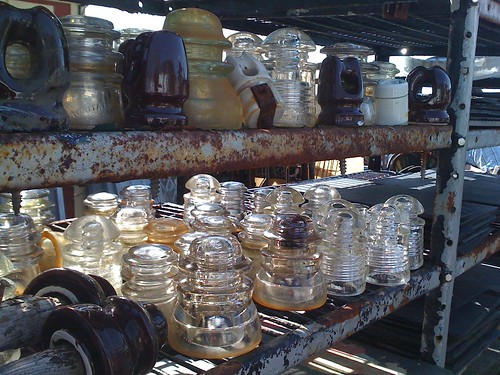
What does one do with all those glass insulators they have sitting around???
Wait what??? You aren't sure what I am talking about or even more odd, you don't have BUCKETS of them sitting around your house? /sigh Oh the things we collect...for one reason or another.

If you really don't know what I'm talking about, let's have a look.


Or how about another look see...


YEP! That is me. YEP AGAIN!!! We FOUND all those insulators while geocaching.
More on that here.

My fascination with these things started a long long time ago.
My Dad would always find them while he was hiking.
I would always look for them and never find them.
Now, I would find them at sales, but that isn't the same as stumbling upon while walking in the woods.

I would pick unique looking ones up at sales. My Dad would give me some.
My Grandmother would find something to use as a candle holder for them (put a votive inside them).
I would get more from my Dad. One day my Dad gave me a bucket full of them.
I already had a copier paper box full of them. Now I have an additional bucket.
THEN, there is the lot in the above picture. Jeesh!! That is an awful lot of insulators just sitting around.

We have put some in the garden.


The bottom picture has the insulators on top of the stakes for the fence for our peas.
You can read about our peas and some more photos here.

They have even worked their way into many rooms in the house, but that isn't why we're here.
You stopped by to read about the blackberries.
We dug up a bunch of blackberry plants from Jim's Mom's. We knew where we were going to put them, but that is about all the further the thought process went. We got them in the ground and put some pavers around them (the pavers were repurposed, we didn't buy new!!) and then we got to talking about what we were going to do to help contain them once they grew up. We decided on something similar to a clothesline and then Jim took it one step further and said, why don't we have our own telegraph poles and use some of those insulators??? (yes, this is one of the reasons he is my number one!!!)

The construction happened quickly and I didn't get to take any photos along the way. That means we get to look at the finished product right away!!! 

Look at how tiny those plants are!!
It is okay that you laughed at my Red Solo Cup Garden.
If you are laughing, I can only hope you are stuck with that song in your head!
We grew lots of stuff from seed this year and the solo cups were our starting pots!

Isn't the telegraph pole pretty cool??
The birds love it and surprisingly they don't bother the berries (much)!
The top left and the bottom picture were taken in May. 
You can't see it very well, but there are two lines of wire running between the poles. 
We talked about how it would be cool when the plants someday topped the wires.
Well, we didn't have to wait very long!!!
Take a look at the top right picture. That was taken just the other day.
We can't believe how fast they have grown...AND...they have even produced berries!
YUM!
Some of the plants are now taller than the top wire, which is roughly five feet!!!!


Here is a peek at the telegraph pole and the bean planter and trellis.
If you missed the post about the planter and trellis, they are way cool. They are made from pallet wood.
In this picture you can see the beans have topped the trellis!!! yay!!!!

Just in case you forgot, we live in the city.
It doesn't much look that way because I grew up in the country.
It is our little piece of the country in the city!

Thanks so much for stopping by! So do you have buckets of these things or am I really the ONLY one??

I am linking up at 

I'm a Fan of My 1929 Charmer Blog!

Photobucket

A 13th Birthday Card

Changing things up a little bit. Today I am sharing a card I made. A friend's daughter turned 13. She asked if I could make her a card with zebra stripes and pink. Let's take a look.


My local scrapbook/craft store didn't have any regular zebra stripe paper.
WHAT IS UP WITH THAT???
I wasn't driving the 15 miles to Hobby Lobby. We all know I would have walked out of there
with more than one sheet of zebra stripe paper.
I kept up the search and found this fabric paper sort of stuff. It would get the job done.

The 1 and the 3 are chipboard (from the stash)
I covered them with pink Stickles (glitter glue) I don't remember the exact color and 
the craft space just had some changes done to it so I am not sure where everything is to 
double check for you. So sorry. :(

The crown is a cut off the Create A Critter cartridge. It is the crown generally given to the frog.

The pink glittery ribbon was also in the stash.

 The inside sentiment was computer generated.
The picture turned out a little blurry, but it is the only I have.
I take two and three of everything, but not this one. Hmm...must have been looking forward to getting to work to get the day over so I could get vacation started!!!


If you have been here for my other cards, you know I like to decorate the envelope in some way.
I used my favorite little Monkey, Changito!

I've been told Haley loved her card.
I hope it is true. I had fun making it.
Happy Belated 13th Birthday Haley!!!

Do you have lots of stuff in your "stash?"

Partying here:


The Taylor House


Wednesday, August 15, 2012

Have you repurposed lately? A "new countertop"

Have you all survived the dog days of summer? We have cooled down here. I actually had to break out a hoodie the other night. Also for the first time in a long time, the thermostat dropped below 70. We don't have central air. That isn't possible in some parts of the country and with these summers getting hotter it might not be possible here much longer.

We were both on vacation last week! I don't have any tropical paradises to share with you, I have something better! Lots of transformations from around the house. It was quite the productive vacation. I, do, get the impression Jim would have liked to relax a little more than we did, but...

Our vacation accomplishments include:
1. An overnight stay with my family. We picked up my Grandma's china cabinet and lots of other goodies while we were there. Made some memories.

2. Picked lots of produce from our garden and canned most of it!

3. Got the china cabinet(s) rearranged and the clutter from that project put away in time to cover the dining room table with the contents from the pantry and all the cupboards near the pantry. I wish I had taken a photo.

4. The dining room table was covered in kitchen products because we added 5 feet of counter space!

5. Some little projects with things that had been sitting around the house.

6. Repurposed another old ladder (this one my Great Grandfather's) into a quilt rack.

7. We visited the moving Vietnam Wall while it was in town. Had birthday dinner with some friends that night too.

8. Jim made an amazing dinner on my birthday and peach crisp from fresh local peaches. YUM!

9. We hit a couple sales and found a few good buys.

10. We watched a lot of Olympic coverage.

It was a productive vacation. I didn't have to go to the office and that was what mattered!!!

Today's post is about number 4! The counter space. We called it "Operation More Counter Space"


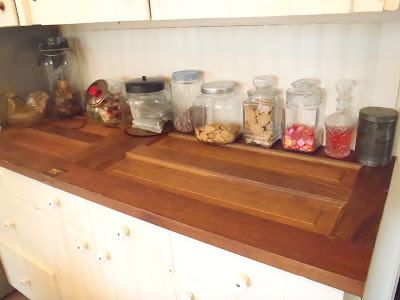
Here is a peek at the end product!

And now here is the story.


These two pieces play a very important role in this story.
We picked the door up at a place in Pittsburgh called Construction Junction. It has been sitting in the basement ever since, just waiting for its "new life." The shutter came from a sale somewhere and has also been waiting for its "new life."


When we bought the house we gutted the kitchen. Yes, I mean gutted!!!!
Jim's Mom redid her kitchen about the same time so we received all the old cupboards out of her kitchen.
They were ours to use as we pleased. One of the pieces was this AWESOME pantry with spice shelves on the inside of the doors. We loved the pantry so much and had it in our heads where it was going that we saw nothing else. The doors on the bottom right are the doors to the pantry. We made the rest of it look like it was one piece. Pretty cool, but.. if we take it out, we can GAIN 5 feet in counter space!!


Here is a peek to the inside, including the spice shelves.


The original cupboards have been in the basement serving a purpose in Jim's shop.
So while things were displaced upstairs, there were plenty of things displaced downstairs, because Jim had to empty this puppy out to bring it upstairs.


Needless to say, this blue wasn't welcome in the kitchen.
Painting must be done.


 The drawers after a coat of paint.


Oh my!!! Look at that wall.
The things you forget about once you cover them up!!


LOOKING BETTER ALREADY!!!!
Don't ya think??


Here is where the shutter comes into play...
Yes, I started grinning at this point.


We took the pantry outside and cut it to the size we wanted.
We brought it back in and...wah lah!


A look at the shutter being painted.
Had to start somewhere and the shutter seemed like the best place since it was the piece holding some suspense!


A look at the paper that lined only ONE Of the drawers.
IT IS GONE!!!!!


All painted up and put back together!!
Can you tell there is a shutter there at first glance?
How about a door?


The door is our NEW countertop!!!!!!
We even kept the hardware!


Please pardon the clutter on the table, but it is canning season...


We also had this cabinet upstairs.
If you look in the picture just above this one you can see this cabinet now hanging on the wall.
I LOVE IT THERE!!!!
I now have a towel draped over the door as well as the ladle holding the candle that can be seen in the next picture.


This basket and candle holder were displaced because we, ok Jim, used one of the "leftover" pieces of the spice shelves as a spice shelf. It was painted up and hung here.


Pretty Nifty huh?


Here is a close up look at the cabinet in its new home!
Want to know why the right door is closed?
First, if it were open it would be in the way when you came in the back door.
Second, it is hiding the bottles that hold the liquid that gets poured into 
the glasses you can see. ;)

In the end, we gained 5 feet of counter space and actually gained cupboard space too!!
It just changes the whole look of the kitchen!!
The only expense we had was a piece of plywood to make the bottom for the "upper cupboards."
I still walk in and am amazed at how different it looks and that our countertop is A DOOR!!!!

What is your favorite part???


Update 8/19/12! This post received the "I think outside the box" award at My 1929 Charmer. Thanks Cathy!!

I was featured on My 1929 Charmer Blog!


Partying at the following fun spots!!!
shabby creek cottage

MightyCrafty.me
I'm a Fan of My 1929 Charmer Blog!


Saturday, August 4, 2012

Yellow Summer Squash recipe and some ramblings

Ah, Ma nature can't make up her mind. We had days of rain and now we have gone days without rain. The garden is looking pretty droopy and I believe we are going to have to water tonight. /sigh

I am writing this post as Jim is in the kitchen fixing the drain for the kitchen sink. Last night as I was draining the dish water from washing all the mason jars we picked up at a sale yesterday, my toes started getting wet. I initially thought I had "splashed" with the dishwater, but definitely not the case. A seal or something let loose. So...that meant the squash I picked this morning were washed in the bathroom sink. That makes me giggle for some reason.

A week ago we tried out a new recipe. Yellow squash summer relish. We grew a couple squash plants this year, but we didn't have any specific recipes in mind. I came across this recipe in a magazine I picked up. We weren't sure what it would taste like. We gave it a shot and if it was a failure, I am pretty sure I knew of some people that would have taken it off our hands. However, a failure it wasn't and the results are going to the canning cellar.

Let's take a look.


I LOVE LOVE LOVE magazines!
I don't know why, but I do!
Magazines with pretty jars on the front (even when those pretty jars require lots of work) are no different.
There are some amazing recipes in these magazines.
Recipes like Yellow Summer Squash relish and Tomato Basil Jam.
Are you grinning and maybe even drooling just thinking about it??
he he


The inside pages are just as beautiful as the covers!


So I prepped the squash -- yep fresh from our garden


Used the food processor to get it, peppers and onions to this point.


This is what it looked like when I took it out of the fridge the next morning.


The final result.
Ready to see the recipe?

Here it is:
Pretty simple really.

10 cups shredded yellow summer squash (about 4 pounds)
2 large onions, chopped
1 large green pepper, chopped 
(I used peppers from the garden of different hotnesses..roughly 1 large green pepper)
6 tablespoons canning salt
4 cups sugar
3 cups cider vinegar
1 tablespoon each celery seed, ground mustard and ground turmeric
1/2 teaspoon ground nutmeg
1/2 teaspoon pepper

In a large container, combine the squash, onions, green pepper and salt. Cover and refrigerate overnight.
Drain; rinse and drain again.

In a Dutch oven, combine the sugar, vinegar and seasonings; bring to a boil.
Add squash mixture; return to a boil. Reduce heat; simmer for 15 minutes. Remove from heat.

Carefully lade hot mixture into six hot pint jars, leaving 1/2 inch headspace. Remove air bubbles; wipe rims and adjust lids. Process for 15 minutes in boiling water canner. Refrigerate remaining relish for up to 1 week.

YIELD: 6 pints

This batch didn't have any turmeric added because there wasn't any in our pantry.
The batch that I am processing this evening will have turmeric added. I can't wait to see the color difference and the taste difference too.
This batch is AWESOME!!!! on burgers. We think it would be EXCELLENT on hot dogs.
We will be trying that sometime this week.

If you give it a shot, I would love to hear what you think of it!!!

I know you really came for the ramblings and not the recipe, so here we go.

Canning season conclusions I've come too so far this season. I find it interesting how I think about things differently now that I share things from our lives with you.

1. Canning Season: the easiest and quickest way to dirty EVERY bowl and every towel in your kitchen.
2. The season for a continually dirty kitchen floor.  ** I'm not saying I don't clean it. I sweep it every day to make sure the seeds and such are gone. I swear that stuff hides somewhere though. You sweep, empty the dustpan and hang up the broom and there is MORE on the floor. :( /sigh. 


Here are some of the tools of the trade. :)


This morning's harvest. That big yellow squash weighed 2 pounds 7 7/8 ounces.
That squash was shredded and is in the fridge doing its thing until later on.
The recipe says overnight, but by the time I get to it, it will have been in the fridge for 12 hours.

With all that produce and fixed drain in the kitchen sink, I must leave you and pay attention to these veggies.
I hope your weekend is shaping up the way you would like.
Any of you processing produce this weekend?

hugs!

Linking up Here:


LinkWithin

Related Posts Plugin for WordPress, Blogger...