Friday, June 22, 2012

An any time sorta card!

Happy Friday Everyone! We made it! The nice thing about this Friday? The humidity is gone! Woo hoo!!!!
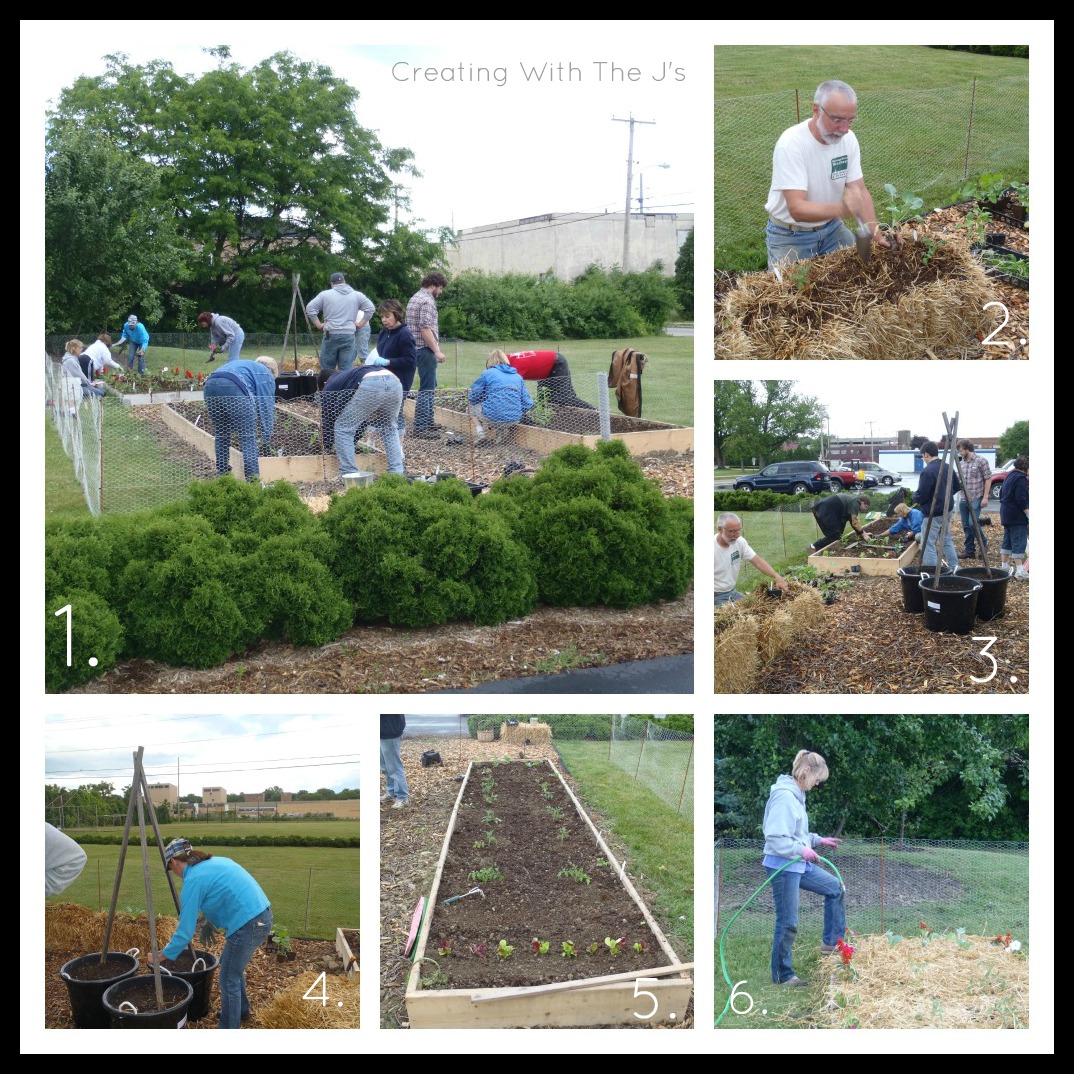
I can tell you the garden has loved the hazy, hot, and humid. The J's...not so much!

I had mentioned I made a card. I even mentioned I wanted to share it soon. I am sharing!!! Sometimes it is the small things in life, right?

I used the Campin' Critters cartridge to make this card. All cuts were done at 4 inches. I made this card for  my Dad. The outside sentiment makes this card extremely versatile. Ready to take a peek?

I used my Gypsy. I can't believe it has almost been a year since I found her at a yard sale!!! What a birthday present! That post can be found here.


For those of you that are Cricut Wise...the mat is an off brand mat I picked up at my local craft store.
I like it pretty well, far better than the newer Cricut mats.
The paper is laid out to make the beaver cut found on page 27 of the handbook.

Here's the outside of the card!!!


"We wood like to say"
I used my Martha Stewart Custom Stamp Setting kit to make the sentiment.
It would have been MUCH faster to use the computer. Perhaps, just maybe, I will think of that the next time!

Isn't that versatile? It could be a thank you card, an I love you card, a congratulations card.
You get my drift.
I made it as a birthday card and father's day card for my Dad.
I didn't get his birthday card made in time and I didn't get it made in time for Father's Day either.
/sigh

I DID use the computer for the inside of the card. The inside says...
"We're sorry we've been so dam busy in the garden that your birthday card and Father's Day card are now combined into one. Happy Birthday! Happy Father's Day! Happy Every Day!

ha ha!!! Get it? We WOOD like to say and we've been so dam busy and the beaver on the front.
I know you got it. Sometimes I just crack myself up!!!

I should have cut a bunch of logs to put on the inside of the card.
Oh well.

I think it turned out pretty cute. The cut turned out amazing and I am pretty sure I will be cutting this busy beaver quite a few more times. He was quite easy to put together!!!

Have a great weekend!!!!
I think a garden tour will be up next! Maybe! 
Hugs everyone!!!~Jen

partying here:


Pink Hippo Party

Monday, June 18, 2012

Moo-chas Gracias!

Hi Everyone!  This is just a quick post. It has been awhile since I've shared a card so I went looking through my pictures that haven't made it to the blog yet and found this one. It has been awhile since I made it, so I don't remember the details. I guess that means this one is intended to be more inspirational than anything!


The cow is from the Create A Critter cartridge. Have I mentioned I love this cartridge?
The sentiment is computer generated. I left the inside blank.

Moo-chas Gracias (thank you) to my faithful few!!!  The good news is I have made a new card and will share it this week!!! There are also lots of pictures from around the garden to share and a new pallet project!!!!

I hope everyone is well!!!

HUGS!!!

Friday, June 15, 2012

Chipped with Charm!

So many things I want to share, sometimes I don't share because I'm not sure where to start.
I sat down for the post and I thought it was going to be about one thing and somehow it has become something altogether different. Part of the fun!!!

A few weeks ago we picked up an old AND HEAVY birdbath at a yard sale. We went to the sale because Stampin' Up supplies were advertised. Don't worry!!! I bought the Stampin' Up supplies too. Ink, paper and stamps oh my!!! There were also some gardening items at the sale, or should I say there were two sales at the same location...one had the stamping supplies and the other lady had some gardening stuff. Anywho!!!! Jim is usually good at spotting these things. I saw it as soon as we pulled up, but I went straight to the stamping stuff. After I spent most of my yard sale money on stamping stuff, I pointed to the bird bath. We came home with the bird bath and some pots and who knows what else. ;)


Here it is.
The lady we bought it from had mixed emotions about selling it.
It was one of the first gifts she ever bought her husband.
He wouldn't ever let her sell it.
He passed away a few years ago and she decided it was time.
We joked how he was going to be upset with her once the money exchanged hands.
We brought it home, went to the home improvement store and bought some stuff to seal the one crack in it.
We left it as it was. It tells a story this way. 
You can see the different colors it has been painted over the years.
I saw this lady last weekend. When I finally placed how I knew her, I pulled out my phone and showed her a picture similar to this one. She was so happy to see it has a new home!
I love it and I think the rose campion (the pinkish flower) looks great next to it.
I met up with a girlfriend I hadn't seen in a couple years and we exchanged plants, this campion was one of them.

The other chipped with charm piece I want to share is a table.
It, too, has a story. I like stories.
We were sitting in the living room the other night. It was pretty much dark out. I heard flip flops approaching the front door. Our neighbor across the street came over to see if we had seen the table up the street and around the corner. We hadn't. She said "Well, it just looks like something you would bring home and do something cute with!" We chatted for a few minutes and walked around the garden. She left, Jim and I came in and got shoes and keys. It was far enough up the street and around the corner that depending on size, carrying it wasn't an option.  YEP!!!! We came home with it.

Here it is!!!


Isn't it the cutest???
We brought home the two chairs. 
The chairs are in worse shape than table.
It doesn't look like it here, but it IS falling apart.
The view from the porch...
and of course there is now an empty spot on the porch,
the spot where I took the planter from...


looking up the sidewalk...
with a view of the side garden


Standing in front of it.
Isn't it charming?
I'm thinking of stenciling our house number on the front of it.


Standing behind it, looking toward the front of the house.
I LOVE IT!!!
I also love that some of my neighbors have learned my style!
{giggle}

One more picture. 
The porch!


I always come up with something for the porch, but I have never been completely happy with the look
until now.


You know that smile you get when you have achieved the image in your head???
This version of the porch gets that.
Now I just need to find something to put on that little table since that is where the planter sitting on 'new' table came from. Always something huh??

Part of the fun? or do you consider it madness?
Either way, it is part of what makes me tick!

Have a great weekend everyone!!!!
~hugs
Jen

Monday, June 11, 2012

Sugar Snap Peas - from seed to our plates!

Part of the reason I was so absent for awhile was our garden. I love being outside and I also love having a a great backyard. Part of that great backyard is EDIBLE!!!!!! The work is paying off. We had our first batch of sugar snap peas for dinner last night.  We've eaten many peas. It is hard to walk by them and not pick one or two and it eat it/them right then. They are so sweet and fresh and crunchy! We were weeding the garden last week and I picked a pea and Jim heard me crunching.  he he he

Here is the life story of our peas!


The peas were planted 3/18/12.


They say to plant them by St. Patrick's Day.
We were close.


3/30/12 a pea sprout!!!
You have no idea how excited we were!
Neither one of us had ever grown peas before!


4/12/12 getting bigger


4/16/12 we gave them a fence
oh my...looking at this picture and know what the garden looks like now...


4/25/12
We planted two rows because that is what the seed packet said.
We used some of our insulators to make the fence more "us!"

 4/25/12 
They are growing up.


5/1/12 and growing...


A blossom!!! 5/25/12


We had to make the fence higher.
We also moved the peas into just one row.
This photo taken 5/30/12


We have pea pods!!!! YAY!!!!


6/3/12
They are higher than the added height.
Yes, this has been a learning process!


more pods


Not a great shot, but...you can see how they have filled in.
Taken 6/6/12.

Yesterday, we took the little colander outside and picked peas for dinner.
We may have eaten a couple while picking!!
We gave them a rinse, took off their strings and cooked them up.
It was nice knowing there weren't all kinds of chemicals on our veggies!!


Aren't they pretty?
Here's what we did!

INGREDIENTS

  • 2 tbsp olive oil
  • 1 pound sugar snap peas, strings removed
  • 3-4 scallions or green onions, sliced on the diagonal
  • Salt
  • A pinch of sugar
  • Zest of a lemon
  • 3 Tbsp chopped fresh mint
  • Black pepper to taste
  • Lemon juice to taste

METHOD

1 Heat a large sauté pan on high heat for 1 minute. Add the olive oil to the hot pan and heat it until it shimmers, about 1-2 minutes. Add the sugar peas and toss to coat with the oil. Sprinkle salt over them and toss again. Allow to cook, undisturbed, for 1 minute.
2 Add the green onions and sprinkle with a pinch of sugar. Toss to combine. Let cook for 1 minute. Toss and cook untouched again, this time leaving everything undisturbed for 2 minutes.
3 Turn off the heat, mix in the lemon zest and mint, then add black pepper and lemon juice to taste. Serve at once.
Yield: Serves 4-6.

We did not add the mint, but did follow the rest of the recipe.
The recipe was found here. We used fresh onions from the garden. This dish was yum-mee!
The rest of the meal was bbq chicken and oven roasted potatoes. We should have taken a picture of a plate, but Jim did take a picture of the potatoes.

Those are pretty too huh?
They are little potatoes (sadly not from our garden)
tossed in olive oil, s&p and chopped rosemary (from our garden)
roasted off at 425 until done. stir them every so often.

I hope you are glad you stopped by today!!!
Hugs!
~jen


Friday, June 8, 2012

Strawberry Rhubarb Crisp--a recipe

Hi Everyone. We had some berries left after we made jam last weekend. We also had some rhubarb in the fridge from a visit with my Grandparents the weekend before. I didn't want a pie. I wanted something a little different. I found a recipe for crisp. It is another recipe from Ina on the Food Network. We haven't had a recipe of hers disappoint us yet!!!


Here's the link to the recipe! I hope you enjoy it!!!!
http://www.foodnetwork.com/recipes/ina-garten/strawberry-rhubarb-crisp-recipe/index.html

Have a great weekend!!!!

Wednesday, June 6, 2012

A night at the community garden

Last night we went downtown to the site of a very new community garden. A friend of ours invited us. There was a presentation by a Master Gardener on companion planting and then everyone that wanted to participate would work together to plant the gardens.

Haven't heard of a community garden? The following is from http://communitygarden.org/learn/


WHAT IS A COMMUNITY GARDEN?

Very Simply, it is:

Any piece of land gardened by a group of people.

Planting SeedlingsWe at the ACGA have a broad definition of what a community garden entails. It can be urban, suburban, or rural. It can grow flowers, vegetables or community. It can be one community plot, or can be many individual plots. It can be at a school, hospital, or in a neighborhood. It can also be a series of plots dedicated to "urban agriculture" where the produce is grown for a market.

Benefits of Community Gardens:

  • Improves the quality of life for people in the garden
  • Provides a catalyst for neighborhood and community development
  • Stimulates Social Interaction
  • Encourages Self-Reliance
  • Beautifies Neighborhoods
  • Produces Nutritious Food
  • Reduces Family Food Budgets
  • Conserves Resources
  • Creates opportunity for recreation, exercise, therapy, and education
  • Reduces Crime
  • Preserves Green Space
  • Creates income opportunities and economic development
  • Reduces city heat from streets and parking lots
  • Provides opportunities for intergenerational and cross-cultural connections
The community garden we went to is located on the college campus downtown. This is the first year for this garden. I have heard and read about community gardens and wondered if we had any in the area. Sometimes we think we are too busy with our own lives to look around. I am so glad we had a personal invitation to go and even more glad that we took the time to go (despite the threatening skies).


Above is a look at what almost kept us away.


So many pictures to share!! I used PicMonkey to edit the photos.
I sure do miss Picnik!!!


Top left is the Master Gardener giving her presentation on biodiversity/companion planting.
In an area like where this garden is located an ecosystem needs to be created. Different kinds of plants need to be planted to invite the necessary bugs/insects to the garden. YES!! There are good bugs and insects.
Plant placement is also important. This is an open area. Crops that require less sun should be planted in front of crops that will get taller and help shade the less sun loving plants.
The one thing I learned...a week too late...this "weed" that I have been pulling is called purslane. It is actually an acceptable ground cover. Oh that hour and a half I spent in the garden last week. Better late than never right?


Top right some folks are looking at the diagrams for what to plant where. Each garden had a map. It made for easy communication since there were so many people. A couple people helped in each garden and in no time at all there were lots of veggies, herbs and flowers in their new growing homes!


The bottom picture is a great picture of Jim giving the plants their name tags for future reference. This picture also shows the teepee/tripod that is now in the black tubs. The garden behind Jim has lettuce and tomatoes.


1. An overall look of the garden. The fence is an attempt to keep out the neighborhood groundhog.
2. An experiment. Something many have read about or seen others doing, but now being tried first hand...
planting the crops in the straw bale. Some compost was placed inside the bale two weeks ago and the bale was left to compost itself, essentially.  Jim and I are quite curious to see how this works and are considering doing it here, at home, next growing season.
3. A look at everyone working together.
4. Planting the pole beans around the poles. She also planted bush beans in these tubs. We came home with the remainder or her bush bean seeds. Now we just have to figure out where to put them. There is a very good chance we are going to get three tubs of our own and make another tee pee. (I know I am behind in sharing our garden with you, but we do have a tee pee in the side garden)  Using these tubs would gain us some more space and more beans for the freezer!!!!!!
5. Another look at the lettuce/tomato bed.
6. Trying to patiently wait for water which is coming from a rain collection system. It isn't overly close to the garden so water was slow coming.  Good things come to those who wait right???


We met some great people, got some great ideas, relearned some things....we just had a really nice evening!
If you want to follow the progress of this garden here is the facebook page. If you are in the area and want to help out, "like" the facebook page to receive updates!


 After we came home, I found out there are many community gardens near us. Are there community gardens in your area?

Thanks for stopping by!!!
~hugs~ Jen

Monday, June 4, 2012

Strawberry Jam - YUM!

Hi Everyone!!!!!!! I hope all of you are doing well!
We are doing well. We have been keeping very busy.
These longer days have been keeping me outside longer, for which I am thankful.
More time outside equates to less time with all of you though.

Over the weekend we hit some yard sales. Found some good deals.
We planned our route so we would be in the area of the LOCAL berry farm.
We came home from there with 11 quarts of strawberries.
These berries are much bigger, sweeter and juicier than last years berries.

YUM!!!!!!


We made strawberry jam.
There are 12 half pints and 12 pints sitting on the counter, with another pint or so sitting in the fridge!
We won't eat it all ourselves. Some of it will be set back to be given as gifts now and again at Christmas!

I sure am thankful Jim likes to help in the kitchen!!
Making the jam as a team is definitely a lot easier and more enjoyable!

We used the recipe straight from the Ball Blue Book of Canning!

Strawberry Jam
yield: about 8 half pints

2 quarts strawberries
1/4 cup lemon juice
1 package powdered pectin
7 cups sugar

Wash strawberries; drain. Remove stems. Crush strawberries one layer at a time. Combine strawberries, powdered pectin and lemon juice in a large saucepot. Bring to a boil, stirring occasionally.  Add sugar, stirring until dissolved. Return to a ROLLING boil. Boil hard 1 minute, stirring constantly. Remove from heat. Skim foam if necessary. Ladle hot jam into hot jars, leaving 1/4 inch headspace. Adjust two piece caps. Process 10 minutes in a boiling water canner.

***have no fear if you can't find the "one package of powdered pectin." It seems they are now selling this pectin in containers. 6 tbsp of the stuff in the container is equivalent to one "old" box. /sigh ***


Here's a look at the jam cooking away.
It turns such a vibrant red once the sugar is added.


Oh and...the house smelled AMAZING!!!!

Here's the end result...


It was gloomy most of the weekend or I would have taken a picture of ALL
of the jars lined up.


I think of our filled jars as works of art!
Look at how pretty!!!

We cleaned up the sticky mess and relaxed with a bowl of ice cream with some of the "too much for another jar" leftovers. YUM!!!!!

Thanks for stopping by and starting your week off with this sweet treat!!!!

~Jen

LinkWithin

Related Posts Plugin for WordPress, Blogger...