Sunday, March 11, 2012

A Pallet wall

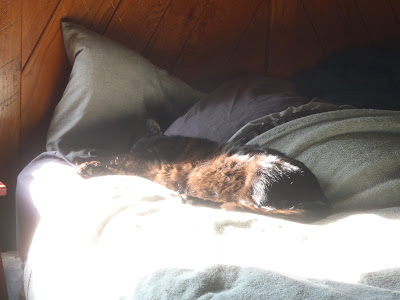
Hi Everyone! The weekend went by so quickly, why is that? The sun was out today and it was gorgeous!! I opened the office/computer room/paper crafting room/the room where Jim has only enough room for his computer and himself window and Jynx has spent the day there. She is still there, actually. The windows in this room face west so it is a nice place for a Jynx to be in the afternoons. (oh I do feel bad about Jim's limited space in here, but for now we don't have many other options. There is a whole upstairs waiting for us to do something with it, but...)

I mentioned on the facebook page Jim had completed a project  in the living room! I am going to share it with you. I am still completely blown away by how it changes the whole room! Let's go back in time a little bit though, roughly 3 years. You see this wall has been somewhat of a thorn from the start.


We sanded, primed, painted, decorated, etc.
It looked like this.


this pic was taken LONG before blogging, don't mind the clutter
or that LOVELY front door

If you've been following for awhile you know that I painted the fireplace
on our first Thanksgiving in the house!
Here is the painted fireplace.


See the crock in the above picture? At some point the paint started cracking in the area of the crock. 
I believe this photo was before the paint started cracking, but once it started it was obvious!! and I began decorating around the cracks to conceal them. :)

When I brought the winter/Valentine's stuff down I didn't rush anything else up. The mantel was bare and it was Jim's day off. He decided to check out what I had been hiding and the checking out process quickly turned into this:


Look at that spot to the left of mirror. AWESOME!!!!
This led to conversation, and ideas, and conversation, and ideas...
and then to this:


and then................... to this:


pallet wood to the rescue...


Now lets add some decor shall we?


This one was taken with my cell phone. Not sure why I didn't take any with the camera when the lights were on. (thank goodness for facebook huh?)

What do you think?
I can't get over how it changes the look.
Thanks for stopping by, I hope you will leave a comment!

Linking up here:


Tuesday, March 6, 2012

Stampin' Up Love & Sympathy cards

This past Saturday was a GREAT!!!!! day in my world! We went to our local craft supply store and came home with the spool of ribbon and the package of card stock I went for ...and... a bag full of rubber stamps out of the clearance bins. It doesn't end there! Saturday was also the day I received my Stampin' Up order!!! Huge grin!  The Stampin' Up order box rocked! I was the hostess so there was FREE stuff.  Woo hoo!

The bad part of all that, NOT KNOWING WHERE TO START!!!!! So many choices, someone please just pick one for me. ha!!!!

I started with the Stampin' Up Love & Sympathy set.

I made four cards. Any paper used on the card came from the scrap drawer. I seriously need to do more projects out of the 'scrap' drawer!!!!! (shh, there are actually two drawers)


I used the following embossing folder and embossed two of the cards.


This first card I used my VersaMark Pad to stamp the flower image.
The sentiment was stamped with brown StazOn.
The ribbon is from the Stampin' Up Beachfront collection


Same embossing folder. Similar scraps.
Repeated the VersaMark flower image and brown StazOn sentiment.

The inside of these two cards looks like this:

I wasn't sure I liked the embossing so I used a plain card base.
Since the paper was from the scrap drawer I had to use side by side background pieces.
Again stamped using the VersaMark pad with the flower image.
I also used foam dots behind the brown card stock so the card wasn't completely flat.


The fourth card was definitely an example of trial and error.


I stamped the flower multiple times, some of them without re-inking the stamp.
There are foam squares behind the sentiment box. 
For being outside of my comfort zone, I think this card turned out pretty well.
Here's the inside:
same sentiment as the others, just a different look


And all four again!
(with some welcomed afternoon sunshine)


Thanks so much for stopping by!
I hope you will leave some comment love.
~hugs Jen

I am linking up here:

Pink Hippo Party

A quick birthday card post!

A couple weeks ago we had dinner here for Jim's Step-Dad. Dinner was delish and there was way way way too much of it. That is what happens when you have a family that likes to cook. We had a very nice evening.

Jim's Step-Dad is a Psychiatrist. I wanted to make a card around his profession, but wanted it to be funny. We did some Google searches and found a number of ideas. The one we decided on was a joke based card.

The Cricut cuts were super easy and are from Campin' Critters.

Here's the card:


HAH!!! Hope you chuckled. Thanks so much for stopping by and have a great day!!!!

~The J's

Friday, March 2, 2012

A Dr. Seuss themed card

Hello Everyone! Happy Birthday Dr. Seuss!!! Thank you for making reading fun!!

I went through some of my supplies last night and found some Dr. Seuss stickers. (this really is no surprise)
Yesterday was the first day of the 365 Cards Challenge. The challenge theme is new beginnings.  Oh The Places You'll Go! is a great book for new beginnings!

I stared at the stickers for awhile, maybe even a long while, and then did a Google search for some clip art.
Here is the final result.


I did round the top right corner of the outside of the card and both top corners on the inside.


I am pretty pleased with it. I guess they all can't be super duper spectacular right?
This will be my first time linking up at 365 Cards! Stop over and check them out! Let me know if you link up so I can be sure to check out your project!

We are in for some possible storms tonight. This might be a good night to clean up my creative mess!
Be safe if there is weather where you are. Have a great weekend!
~The J's

Thursday, March 1, 2012

Head over heels for you...Create A Critter Turtle

March 1st! Where does the time go? Tomorrow is March 2nd, which is Dr. Seuss' birthday. Anyone doing anything special with their kids for Dr. Seuss? I'm hoping to do a couple Dr. Seuss things for you, but that is dependent on finishing a card order tonight. If nothing else I will put together a fun web-based post about Dr. Seuss!

I think the turtle from Create A Critter is cute. Ok, ok! Which ones aren't cute?  I know, right? So, let's see. Today I thought I would share another cute cut from the CAC cartridge.

I cut the turtle and layers out...


I ran his shell through my Sizzix Texture Boutique. I also used foam squares to give his shell some depth.
What you can kind of see in the above picture is I cut his head off. /gulp. Poor thing. I regret having not done this post sooner. I believe there was some thinking involved to make the next step happen the right way. I'm very sorry that I don't remember or didn't take notes.


The card was going to say Head over heels for you...so he needed beheaded only to get his head back in a different way. I still felt bad.


The sentiment is computer generated.


"Turtley in love with you" would be another cute one don't you think?

What crafty things are you up to? Thanks for stopping by!!!
~Jen

Wednesday, February 29, 2012

Nap time with Jynx!

Unlike today, it was very sunny here on Sunday!! I was making cards in the office and had the blinds pulled up. Jynx was on the window sill in the office within minutes. Since she was so happy in the window I went and put up the blind in bedroom.

She was one happy (and warm) cat during her Sunday nap!!


and she managed to stretch out just a little more...

Thanks for stopping by! 


Friday, February 24, 2012

One stamp, many St. Patrick's Day cards!

I've been busy stamping, coloring, adhesive-ing (new word!!!)! Last night I finished up a bunch of St. Patrick's Day cards. I used the Stampendous! Lucky Fluffles stamp. He's a cutie! It amazes me how one stamp and some accessories can look so different.  Let's take a look shall we?!


All stamps were colored the same.
I used the Martha Stewart glitter marker to color his shamrock and the gold buckle of his hat.
The green and the black on the hat ... Stampin' Up! watercolor pencils and then blended.

MOST of the paper, including the cards themselves, is from Canvas Home Basics from Hobby Lobby.
The other paper is from the scrap drawer. Have I ever mentioned I have too many of those scrap drawers?

Since I had quite a few cards I put them in collages over at Picnik. I sure am going to miss them come April.
*sniff*

Here are the rest of the cards!!!


A thank you card


Two birthday cards


...and a BUNCH of Happy St. Patty's Day cards...


...I DID say a bunch...


On the inside, the cards look similar to this.
Each one a little different, but similar.


The sentiment stamp is from Hampton Art.
The shamrock is from Stampabilities.

I think they turned out cute. This was only my second time using buttons on cards.
I'm quite happy with how they turned out.

As always, thanks so much for stopping by!!!!
Have a great weekend!!!
~Jen
I have since found a website that sums it all up for me! I do have issues!!!!!
Linking up here!!!!

Paper Issues Blog Design

LinkWithin

Related Posts Plugin for WordPress, Blogger...