Friday, September 7, 2012

Morning Glories

I was out feeding the birds the other morning and saw this beautiful blue bloom in one of our gardens!


A beauty isn't she??
It made me wonder what the blooms looked like on the side of our house.
The plants have been beautiful but there haven't been many flowers.
Off to that side of the house I went.


Anyone else suppose this is a problem??????????
The Morning Glories pulled both trellis over and on top of themselves.
...yep...a little heart sinking here...

They have since been propped up, but no where near as pretty as they were.
We didn't fertilize or feed them anything. Just water and a southern exposure!
I do hope there was a gnome around when they fell. I hope there was someone present to yell
TIMBERRRRRRRRRRRR. :) So!! That means, in my head anyway, there was a cute little gnome nearby.

Any garden "troubles" at your place? How about blooming beauties???

Thanks for stopping in!
Don't miss the GIVEAWAY that is taking place! A belated blog birthday! You have 6 days left to enter!

Thursday, September 6, 2012

A belated blog birthday giveaway!

Better late than never!!!!!! Creating With The J's turned one year old a few months back. I wanted to say thank you then, but things just weren't working out that way!!! Have no fear, the giveaway is here!!

I was at Hobby Lobby yesterday and thought of all of you!!! We're having a giveaway!!  I have a number of fun paper craft items for one lucky winner!


I needed some Halloween supplies and thought you might need some too.
3 sheets of double sided 12x12 paper
2 sheets of one sided 12x12 paper
one pack each of envelopes and cards
one adhesive runner
4 spools Halloween ribbon
miscellaneous Halloween and fall stickers and embellishments
2 rubber stamps
and one pack of nutcracker stickers...hey! I thought they were sweet!


The rubber stamps say 
happy halloween
and
Thank you from the bottom of my heart!
I do thank you from the bottom of my heart for following along as we have seen ups and downs in the last year. I have lots of crafting in store for the upcoming fall and winter days!!!

I will be using rafflecopter for the giveaway.
See the details below!!!

Good luck and thank you, thank you, thank you so much!!!!

a Rafflecopter giveaway

Wednesday, September 5, 2012

A Scarecrow!

This one is going to be a super short post! I was looking through some pictures and came across this scarecrow. He was made in those days before this blog existed. There are no photos to help you out, but he was pretty simple.

 
His head is made from two "head shapes" cut from fabric and sewn together, but not all the way, because...
you need a hole for the stuffing.

His eyes are made from buttons.
His nose is a piece of scrap fabric
His mouth is drawn on with a marker.
His hat and hat accessories came from the dollar store.

 
You can't see it, but he is on a stick.
There is a stick going into his head and another stick nailed or screwed to it.
His "straw arms" are made from raffia and tied to the stick.
The chest "straw" is made the same way.
His scarf is made from scrap and his flannel is one Jim no longer wore.

Really, the hardest part about him is deciding where to put him.
He hasn't yet found a home this year. He is sitting at the top of the attic stairs waiting to go outside.
That translates into, he's waiting for me to make up my mind!!!!
ha ha ha, hey it is true!

Once he finds his place this year, I will share him again.
Perhaps my next post, I will link back to other Fall posts.
In the meantime, let me know what you think of my not so scary scare crow.
Do you have a scarecrow?
OH!!!!!!
Get ready for a giveaway.
Better late than never right???? 
Going to have a belated blogiversary giveaway!
Stay tuned!

Hugs
Jen


P.S. I chuckled when I looked at these pictures. There is a big whiskey barrel sitting on the porch these days. It looks a little different.

linking up at
The ArtsyGirl Connection for the Fall Crawl
Someday Crafts Whatever Goes Wednesday

Saturday, September 1, 2012

Cucumber Sauce Recipe

Hi All!! I hope you are safe and dry where you and yours are. The remnants of Isaac are making their way into Western Pennsylvania as I type. The rest of our Labor Day weekend is looking like a wash out. Kinda sounds like a good couple days to get something done in the craft space, doesn't it? I hope so! I have a couple Cartridges laying here trying to decide where I want to start!!! I can't wait!!!

Today I am sharing with you a recipe for cucumber sauce or Tzatziki. We have a hot dog shop not far from us that also serves some Greek dishes. This tzatkiki sauce comes with a couple of the dishes and is D-E-L-I-S-H.  We've been wanting to try our hand at it and I FINALLY remembered to buy the Greek Yogurt so we could give it a shot! This is a common sauce for souvlaki or gyros.

I did some reading and looking and more reading and more looking. It can be made with regular yogurt, but the yogurt will need strained. Everyone has variations to how they make it.


Looks pretty tasty huh???

Here's what I did.
...and when I do it over again, I will only make half of this recipe...
Hey! It is just the two of us!


3 cups Greek Yogurt 
(if you are going to use regular yogurt, please spend some time with your best friend "Google"
Juice of one lemon
1 garlic clove, chopped (garlic powder will work)
2 medium cucumbers, seeded and diced
1 Tablespoon kosher salt (for salting the cucumbers to help draw out some more liquid)
1 Tablespoon chopped fresh dill
Salt and Pepper to taste

Peel the cucumbers, use a spoon to scrape out the seeds.
I can't show you a picture of this part because I was using cucumbers that were leftover from making
refrigerator pickles. Anywho...
Slice the cucumbers into a colander and sprinkle the 1 tablespoon salt on to the cucumbers.
Let the cucumbers sit 15-30 minutes to draw out water. Drain the cucumbers.


In your food processor, add the cucumbers, garlic, lemon juice and dill and process until well blended!
Stir this mixture into your yogurt. Add additional salt and pepper for your taste.
Refrigerate for a couple hours so the flavors can marry!
Ours only refrigerated for an hour. It was good, but it was WAY WAY WAY better the next day!


We grilled up some chicken that had marinated in Italian dressing and some garden fresh onions and misc. peppers. This made a great dipping sauce. It also made me wish for a pita, that would have made it perfect.
This will keep in your fridge for a few days.
Some liquid will separate from the sauce and I would drain that liquid off and then stir your sauce back together.

I hope you enjoy! Have a great rest of the weekend and thanks so much for stopping by!!!
hugs
Jen

Wednesday, August 22, 2012

A rolling pin towel holder

Fall is in the air. Yesterday, I saw my first tree with its leaves changing. /sigh...so soon? already?
I am enjoying the cooler weather though. We started ripping tomato plants out of the ground. We really wanted to plant some fall crops last week, but now we are shooting for this week. Keep your fingers crossed. We have been getting lots of canning done and there will be pictures of that in the future. PROMISE!

I wanted to give you a closer look at the rolling pin towel bar that you had a glimpse of  when I posted about the countertop.   


Above is a look at the end result. The link back to that post can be found above the picture as well.
:)


The rolling pin used as the towel bar is the same rolling pin as in this picture.
These two pieces were given to me by a friend who was cleaning out her basement.
I love it when my friends bring me their "junk!!"
When she brought them to me she said "I knew if there was anyone that could give these things another life, it would be you!" {giggle}
These pieces sat on the dining room table for a couple days and "their new life" hadn't come to me yet.
When we started making room for Grandma's china cabinet (post coming soon, I PROMISE) these pieces were placed in a basket to go upstairs.

When we redid part of the kitchen there was a bare spot on the side of the 'bottom cupboards.' That is when the light came on. I went and got the rolling pin (and Jim) and I went over to where I wanted it and said "Is there any way you can make this hang here?" He said "Of course!", took the rolling pin and disappeared downstairs. He would come back up now and then but there wasn't any sign of what was taking place. Several hours later he comes upstairs with a container that had parts, pieces and tools and that is how we get to this picture:


Well now!! Isn't that nifty!!! He even stained them!!


Speaking of stain, we have decided we are going to stain this end of the door.
We made a cut here for it to fit and the cut is a little tooooo bright!

Back on track, the rolling pin rests in the little notches. I call them J hooks.
They looked like J's before he attached them to the cupboard.


A closer look at the notches and the lovely green handles!!!
I think the green handles are my favorite thing about the rolling pin...
ok, a close second behind being the first person my friend thought of!!!!!


I had been sorting linens for a different project (the answer to the question you just asked yourself in your head is TOOOOO MANY!!) I went and got this towel from one of the piles.

and....


There you have it! 
I think it works nicely on this space!
We already had all the pieces, parts, etc for this project!!!

Clever huh???

What would you have done with the rolling pin????


Partying here:


Friday, August 17, 2012

Growing blackberries on a telegraph pole

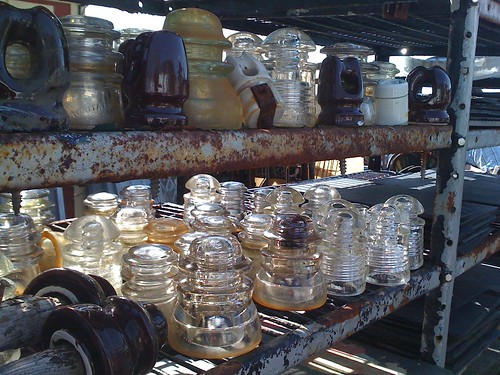
What does one do with all those glass insulators they have sitting around???
Wait what??? You aren't sure what I am talking about or even more odd, you don't have BUCKETS of them sitting around your house? /sigh Oh the things we collect...for one reason or another.

If you really don't know what I'm talking about, let's have a look.


Or how about another look see...


YEP! That is me. YEP AGAIN!!! We FOUND all those insulators while geocaching.
More on that here.

My fascination with these things started a long long time ago.
My Dad would always find them while he was hiking.
I would always look for them and never find them.
Now, I would find them at sales, but that isn't the same as stumbling upon while walking in the woods.

I would pick unique looking ones up at sales. My Dad would give me some.
My Grandmother would find something to use as a candle holder for them (put a votive inside them).
I would get more from my Dad. One day my Dad gave me a bucket full of them.
I already had a copier paper box full of them. Now I have an additional bucket.
THEN, there is the lot in the above picture. Jeesh!! That is an awful lot of insulators just sitting around.

We have put some in the garden.


The bottom picture has the insulators on top of the stakes for the fence for our peas.
You can read about our peas and some more photos here.

They have even worked their way into many rooms in the house, but that isn't why we're here.
You stopped by to read about the blackberries.
We dug up a bunch of blackberry plants from Jim's Mom's. We knew where we were going to put them, but that is about all the further the thought process went. We got them in the ground and put some pavers around them (the pavers were repurposed, we didn't buy new!!) and then we got to talking about what we were going to do to help contain them once they grew up. We decided on something similar to a clothesline and then Jim took it one step further and said, why don't we have our own telegraph poles and use some of those insulators??? (yes, this is one of the reasons he is my number one!!!)

The construction happened quickly and I didn't get to take any photos along the way. That means we get to look at the finished product right away!!! 

Look at how tiny those plants are!!
It is okay that you laughed at my Red Solo Cup Garden.
If you are laughing, I can only hope you are stuck with that song in your head!
We grew lots of stuff from seed this year and the solo cups were our starting pots!

Isn't the telegraph pole pretty cool??
The birds love it and surprisingly they don't bother the berries (much)!
The top left and the bottom picture were taken in May. 
You can't see it very well, but there are two lines of wire running between the poles. 
We talked about how it would be cool when the plants someday topped the wires.
Well, we didn't have to wait very long!!!
Take a look at the top right picture. That was taken just the other day.
We can't believe how fast they have grown...AND...they have even produced berries!
YUM!
Some of the plants are now taller than the top wire, which is roughly five feet!!!!


Here is a peek at the telegraph pole and the bean planter and trellis.
If you missed the post about the planter and trellis, they are way cool. They are made from pallet wood.
In this picture you can see the beans have topped the trellis!!! yay!!!!

Just in case you forgot, we live in the city.
It doesn't much look that way because I grew up in the country.
It is our little piece of the country in the city!

Thanks so much for stopping by! So do you have buckets of these things or am I really the ONLY one??

I am linking up at 

I'm a Fan of My 1929 Charmer Blog!

Photobucket

LinkWithin

Related Posts Plugin for WordPress, Blogger...